
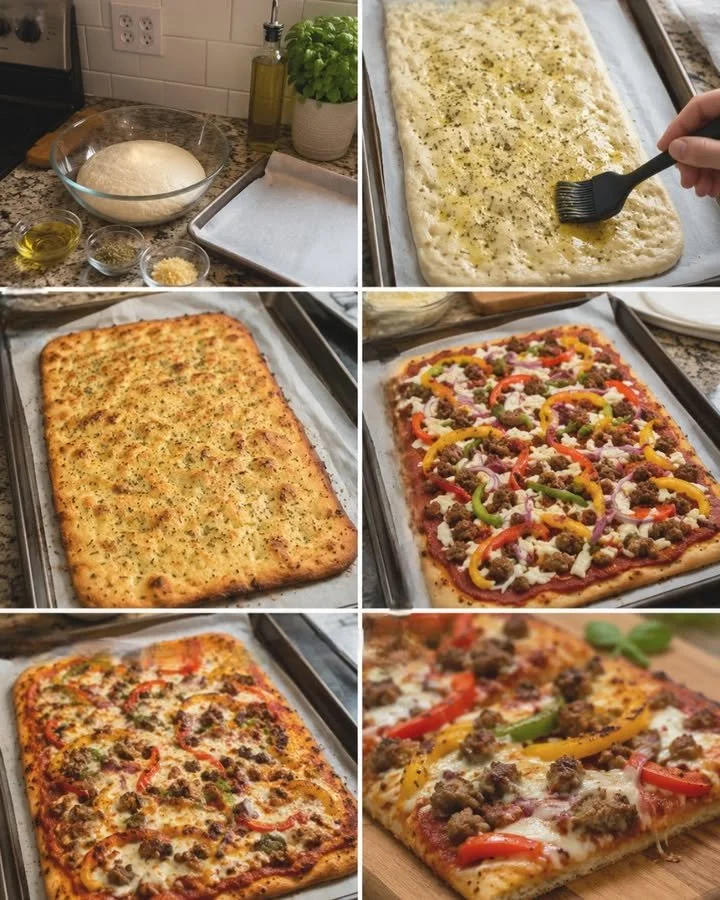
Keto Sheet Pan Pizza with a Garlic Herb Crust
Are you craving pizza but feeling the weight of all those carbs? You’re not alone. Many of us miss that delicious, cheesy experience of pizza night. But guess what? We’ve found a way to enjoy pizza again without the guilt or the dreaded carb coma!
Imagine a thick, chewy crust that’s irresistibly buttery, infused with garlic and herbs. Top that with savory sausage, sweet bell peppers, and a generous layer of melted mozzarella. Whether it’s a family gathering or a cozy night in, this Keto Sheet Pan Pizza is your ticket back to pizza paradise.
Why This Works
The secret lies in the crust. Most traditional pizzas can leave you feeling sluggish and guilty afterward, thanks to the excess carbs. This keto version, however, gives you the satisfaction of pizza night without the crash. With a perfect balance of flavor and texture, this cauliflower-based crust remains fluffy in the center yet crispy on the edges, reminiscent of your favorite takeout. Plus, it has garlic and herbs that elevate the taste to new heights!
Main Content
Here’s everything you need to create your very own Keto Sheet Pan Pizza with a Garlic Herb Crust.
Ingredients
For the Crust:
- 1 medium head of cauliflower, riced (about 4 cups)
- 1 cup shredded mozzarella cheese
- 1/4 cup grated Parmesan cheese
- 2 large eggs
- 2 teaspoons garlic powder
- 1 teaspoon dried basil
- Salt and pepper to taste
For the Toppings:
- 1 cup shredded mozzarella cheese
- 1 cup cooked sausage (Italian or your preference)
- 1/2 bell pepper, sliced (any color)
- 1/4 cup sliced olives (optional)
- Fresh basil leaves for garnish
Step-by-Step Guide
-
Preheat the Oven: Start by preheating your oven to 425°F (220°C). Line a baking sheet with parchment paper for easy cleanup.
-
Prepare the Cauliflower Rice: If you haven’t already, rice your cauliflower. You can do this using a food processor or by grating it manually. Steam the riced cauliflower for about 5 minutes until tender and let it cool slightly before handling.
-
Make the Dough: In a large bowl, combine the riced cauliflower, mozzarella cheese, Parmesan cheese, eggs, garlic powder, dried basil, salt, and pepper. Mix until well combined.
-
Shape the Crust: Spread the mixture out on the prepared baking sheet, forming a rectangle or whatever shape you prefer. Make sure to spread it out evenly, about 1/4 to 1/2 inch thick.
-
Bake the Crust: Bake the crust in the preheated oven for 15-20 minutes or until it’s golden brown and firm to the touch.
-
Add the Toppings: Remove the crust from the oven and top it with a layer of shredded mozzarella cheese, cooked sausage, bell peppers, and olives if you’re using them.
-
Final Bake: Return the pizza to the oven and bake for an additional 10-15 minutes, or until the cheese is melted and bubbly.
-
Garnish and Serve: Once it’s out of the oven, let it cool for a few minutes. Garnish with fresh basil leaves before slicing it into squares.
Expected Results
Once you’ve made this Keto Sheet Pan Pizza, expect cheers from your family or guests! The aroma will fill your kitchen, and the taste will keep everyone coming back for more. You’ll have a wonderfully satisfying pizza that caters to your cravings without the guilt of traditional options.
Extra Tips
- Customize Your Toppings: Feel free to experiment with your favorite toppings! Mushrooms, onions, or pepperonis can easily be swapped in.
- Storage: Leftovers (if there are any) can be stored in the refrigerator for up to 3 days. Reheat in the oven to maintain that crispy texture.
- Make Ahead: You can prepare the crust in advance and store it in the fridge or freezer. Just add the toppings before baking.
Conclusion
Keto Sheet Pan Pizza is your delicious and guilt-free escape back to pizza nights. With its golden, bubbly crust, savory toppings, and comforting flavors, it’s everything you’ve been missing and more. So don’t hold back—indulge guilt-free. Pizza night is officially back on the menu, and it’s every bit as joyful as you remember! Enjoy every last bite!